Thinking of a classic Rails app with user uploads, the usual workflow is: upload user file to the controller, process the upload with gem like CarrierWave or Paperclip, upload it to some cloud storage and save the model with a reference to the storage.
It's a proven solution especially when you want to validate, resize or somehow process the file — for example user avatar. But what if the file is just a file, and it doesn't need to be processed by the backend? Attachable CV in PDF is a good example of such case. By using Amazon S3 direct uploads, you can avoid extra load on you application servers with file uploads, and serve more requests instead.
Instead of uploading a file into Rails controller, AWS S3 allows to presign a unique upload URL, and then the user submits the form with file directly to that Amazon URL. In the database, we can just store address of the file on S3, like https://s3-eu-west-1.amazonaws.com/mybucket/myfile.pdf.
There are few other blog posts about mastering Rails and S3 Direct uploads, but in my post I want to focus on "vanila" solution, without using any gems like CarrierWave, Paperclip or s3_direct_upload.
Assuming we have Rails 4.2 app, let's start by creating the User model with avatar field:
{% highlight bash %} $ rails g scaffold user name avatar $ rake db:migrate {% endhighlight %}
To use Amazon S3 API, let's add the official AWS gem, aws-sdk-v2 to the Gemfile:
{% highlight bash %} $ echo "gem 'aws-sdk', '~> 2'" >> Gemfile $ bundle install {% endhighlight %}
User upload will be sent to the presigned S3 URL, and this URL will be valid only for single upload. In this case, user won't be able to upload more files then we allow and to pollute the S3 bucket. You can also limit the maximum allowed file size to upload.
We will need controller action to presign the request:
{% highlight ruby %}
app/controllers/users_controller.rb
class UsersController < ApplicationController def presign_upload # pass the limit option if you want to limit the file size render json: UploadPresigner.presign("/users/avatar/", params[:filename], limit: 1.megabyte) end end {% endhighlight %}
{% highlight ruby %}
config/routes.rb
[...] resources :users do collection do put :presign_upload end end {% endhighlight %}
This controller action will accept filename parameter like selfie.jpg and generate the presigned URL for exactly this filename.
Let's write the UploadPresigner class to work with S3:
{% highlight ruby %}
app/services/s3_presigner.rb
class UploadPresigner def self.presign(prefix, filename, limit: limit) extname = File.extname(filename) filename = "#{SecureRandom.uuid}#{extname}" upload_key = Pathname.new(prefix).join(filename).to_s
creds = Aws::Credentials.new(ENV['AWS_ACCESS_KEY_ID'], ENV['AWS_SECRET_ACCESS_KEY'])
s3 = Aws::S3::Resource.new(region: 'us-west-1', credentials: creds)
obj = s3.bucket('yourproject').object(upload_key)

params = { acl: 'public-read' }
params[:content_length] = limit if limit

{
  presigned_url: obj.presigned_url(:put, params),
  public_url: obj.public_url
}
end end {% endhighlight %}
Basically, this class takes a filename, makes a request to AWS S3 API and returns presigned URL with token, which we will use on the client side.
Please notice that we use ENV variables to store AWS access and secret keys, don't forget to obtain them! It's also important to create the S3 bucket before uploading files (replace the bucket name in the code) and to configure it.
Now, let's configure the S3 bucket to receive uploads from the browser.

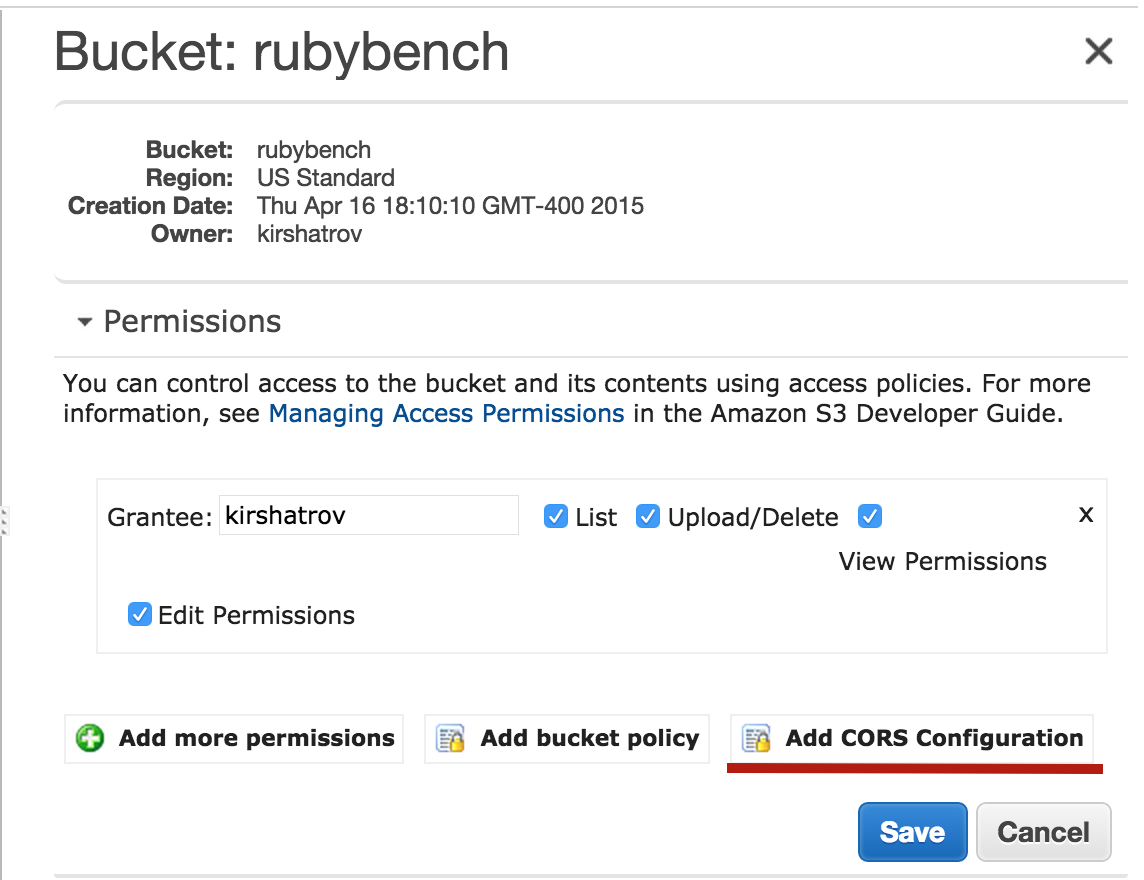
Open AWS Console, go to the bucket properties, open "Permissions" and click on "Add CORS configuration". Then, paste this XML snippet:
{% highlight xml %}
These settings are required to process direct uploads to S3 and they are recommended by AWS.
Now when your bucket is able to accept browser uploads, and it's time to prepare the form.
{% highlight html %}
app/views/users/_form.html.erb
<%= f.hidden_field :avatar, class: "js-signed-upload-value" %>
<% if f.object.avatar.present? %> File attached <% end %>
And the Javascript part:
{% highlight coffee %}
app/assets/javascripts/users.coffee
uploadWithUrl = (form, file, presignedUrl, publicUrl) -> # disable submit while uploading and update status submit = form.find("input[type='submit']").attr('disabled', true) $('.js-signed-upload-status').text('Uploading...')
create PUT request to S3
xhr = new XMLHttpRequest() xhr.open 'PUT', presignedUrl xhr.setRequestHeader 'Content-Type', file.type
xhr.onload = -> submit.removeAttr('disabled') if xhr.status == 200 $('.js-signed-upload-value').val(publicUrl) $('.js-signed-upload-status').text('')
xhr.onerror = -> submit.removeAttr('disabled') $('.js-signed-upload-status').text('Failed to upload. Try uploading a smaller file.')
xhr.send file return
upload = (form, file, url) ->
before actually uploading the file, we need to ask controller for a token
$.ajax(
	url: url + '?filename=' + file.name + '&filetype=' + file.type,
	method: 'PUT',
	accept: 'json'
).success((data)->
# pass presigned public urls to the function to actually upload it
	uploadWithUrl form, file, data.presigned_url, data.public_url
)
uploadHandler = (field)-> file = field.files[0] if file == null return
form = $(field).parents("form").eq(0) upload(form, file, field.dataset.presignUrl)
$ -> $('.js-signed-upload').change -> uploadHandler(this)
{% endhighlight %}
Now when the page is ready, start rails server and open the /users/new in your browser.
Enter some name and choose an avatar. After you submit the form, controller will redirect you to the show action. Let's improve it a bit to display the link to attachment:
{% highlight html %}
app/views/users/show.html.erb
[...] <% if @user.avatar %>
Avatar: <%= link_to image_tag(@user.avatar), @user.avatar %>
<% end %> [...] {% endhighlight %}Now all user uploads in your app are processed directly to AWS S3, without causing any extra load on the backend.
By using direct uploads in the customer's app, I reduced the file storage codebase and avoided using some unnecessary gems.
There are however situations when you can't use direct uploads: for example, if you want to resize or somehow validate the user upload.
As the next step, you can add the code for cleanup: after the record is destroyed, the app should destroy remote file on S3 storage.
